Thursday 13 October 2016

Getting Protected site back online after using Forced Recovery Plan with SRM

This week I had a question from one of my customer on how to correctly test disaster recovery with SRM in the scenario as close as possible to a reality.

Most of you probably know how you can run non-disruptive failover test with SRM which lets you verify the SRM recovery plan without any impact on the Production servers.

You might also used SRM to test a planned failover where virtual machines are powered off at the Protected site and then recovered at the Recovery site.

The good thing is that official documentation provides comprehensive instructions on how to run these tests.

However, the provided information on how to correctly deal with forced recovery is a bit vague. This type of recovery is ran when the Protected datacentre is not available. And that's what our customer wanted to test to be 100% sure their infrastructure is covered for real disaster.

Obviously, when your Protected Site is down and you have to recover your environment there are not many choices. You can only run Forced Recovery on the SRM server at the Recovery Site.

But the documentation does not explain on how to deal with the situation when the Protected site comes back online.

Here is what it says:

"After the forced recovery completes and you have verified the mirroring of the storage arrays, you can resolve the issue that necessitated the forced recovery. After you resolve the underlying issue, run planned migration on the recovery plan again, resolve any problems that occur, and rerun the plan until it finishes successfully. Running the recovery plan again does not affect the recovered virtual machines at the recovery site."

When I read it first I had several questions:

1. What direction should be the storage mirroring configured before running Planned Migration provided that we have already recovered VMs at the Recovery Site?
2. How planned migration will be able to complete successfully when there are so many steps in the recovery plan that were already completed during the Forced Recovery? If you ever ran Planned Migration you know that any error will stop the Recovery Plan.
3. Should I pause/stop the storage replication prior to running Planned Migration?

So, I had no clear understanding of the sequence of actions for this scenario. That's where my home lab proved to be a very efficient investment.

To make it as close as possible to real infrastructure I deployed HPE VSA to simulate array based replication. Both sites consist of 3 hosts running, the Protected Site runs a couple of CentOS VMs on a replicated datastore.

So, here is sequence of steps I used in my lab to simulate disaster, to run forced recovery and to restore the status quo after bringing the Protected site back online.

Please note that there are many different DR scenarios and I don't have to test all of them. Also, running everything as nested lab I can't test different types of storages or replications so the output of Forced Recovery with HP 3PAR or EMC VMAX with synchronous replication might be different to what I got. 

1. The failure of Protected Site was simulated using firewall rules to deny all traffic between sites, including the replication traffic

2. Logged into vCenter at the Recovery Site and ran Forced Recovery plan.

The following screenshot depicts all the steps of the recovery plan and their status.


3.  After confirming that all VMs were successfully restored at the Recovery Site I shutdown the VMs at the Protected Site.

3. Removed the firewall rules to restore the connection between sites

SRM servers give you some hints on how to restore the status quo.


Protected Site status

Recovery Site status

Replication status
As you can see SRM understands that the failover is not fully completed yet. Therefore the replication status of the device is 'Failover in Progress'

The Recovery Plan

As you can see the Recovery Plan looks different now compared to the one in Step 2.  It actually tells you now to run the Planned Failover again.

4. Ran the Planned Failover again as instructed


Looks like SRM is smart enough to skip the steps that have already been done.
Essentially, the following actions are conducted when running Planned Failover:

 * Protected VMs are shutdown at the Protected Site
 * Protected VMs are converted to Placeholder VMs
 * The protected datastores are unmounted at the Protected Site
 * The replicated LUNs are converted to read-only mode

That brings both SRM servers to consistent state where all workload now runs at the Recovery site and replicated to the Protected Site.

Now you can follow the regular routine and reprotect the workload and then move it back to the Protected site using the Planned Failover option.

Hope that helps understand the logic of SRM Recovery after Forced Recovery.

Friday 9 September 2016

Securing Remote Access with Sophos UTM


Two-factor authentication is probably the best way to protect against remote attacks nowadays. You may take numerous precaution measures to protect your computer, but you can never be 100% sure your credentials are not compromised.

Sophos UTM provides built-in support of two-factor authentication. And as with all other features in UTM, 2FA feature is implemented in a very user-friendly interfaces.

In my previous blog post I showed how easy to enable and configure different types of Remote Access with Sophos UTM. Today we will see how to secure the Remote Access with OTP.

Additionally, we will review the installation of third-party SSL certificate from one of the providers that is trusted by your browser. Not that I expect some phishing attacks on my home lab, but it will stop the browser throwing the certificate error every time you access UTM User Portal.

Ok, let's start with OTP configuration.


1. Log into Sophos UTM and go to Definition & Users - Authentication Services 


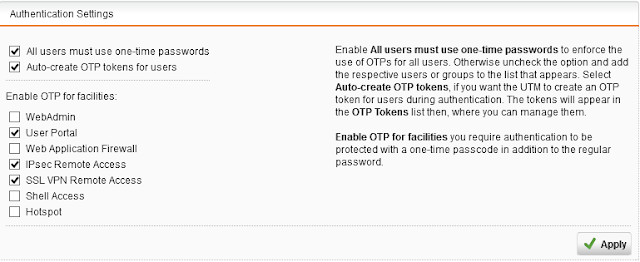
2. Open One-Time Passwords tab and enable the service 
  • Check that 'Auto-create OTP tokens for users' setting is enabled 
  • Check that OTP is enabled for User Portal 
  • Check that OTP is enabled for SSL VPN Remote Access 


3. That's it. See how simple it is?

Now let’s have a look at how we get it working.

1. Install Google Authenticator app on your mobile. 

2. Login to the user portal with your credentials. Note, you can't use OTP yet.

3. You will immediately see the QR code which you will need to scan with Google Authenticator


4. Once Google Authenticator successfully reads the QR code press Proceed with login button which will bring you to the login page again

5. In the password field you have to type your password directly followed by passcode displayed by Google Authenticator. 

6. Now you can see the details of your OTP in the User Portal 
Use the same combination of Password+Passcode when you authenticate with SSL VPN client

One last thing. In case you loose your phone or you brake it, or the phone is reset and Google Authenticator is not there anymore you won't be able to authenticate to Sophos UTM.

For this type of situations you might wanna have some pre-generated authentication codes stored somewhere in a safe and secured place. To get these codes:
  • Go to One Time Password tab again. 
  • Click the Edit button on your username entry
  • Expand the Advanced Settings and press the green Plus button to generate one time passwords.


Now let's talk about 3rd party certificate installation.

You will need your own domain name. When you request a certificate the Certificate Authority will normally require you to validate the domain name ownership by sending verification code to the email address of the domain owner or by asking you to create a DNS records for that domain.

1. Generate a pair of keys 


openssl genrsa -aes256 -out myUTM.key 2048


2. Generate Certificate Signing Request 


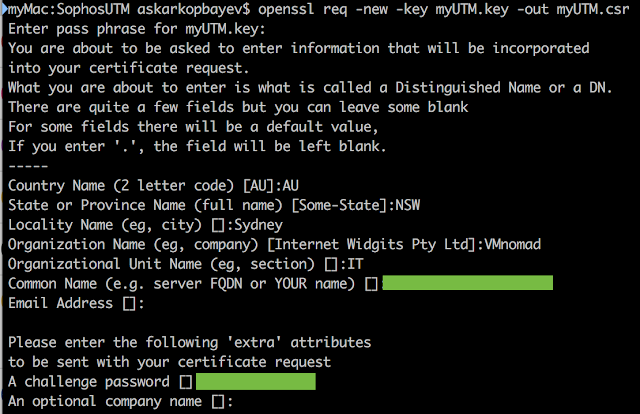
openssl req -new -key myUTM.key -out myUTM.csr
This command will require additional input of information, including the domain name record of your UTM to be used as a Common Name in the certificate.  


3. Upload CSR to a third party Certificate Authority


4. Download the signed certificate from the CA
5. Using the certificate from the CA and the key file generate PKCS12 file.


openssl pkcs12 -export -in Cert.pem -inkey myUTM.key -out myUTM.p12
Please note that you have to use .pem format. Don't use .p7b or .cer format of the certificate, otherwise you will get the following error


6. Upload the PKCS12 certificate to the Sophos UTM


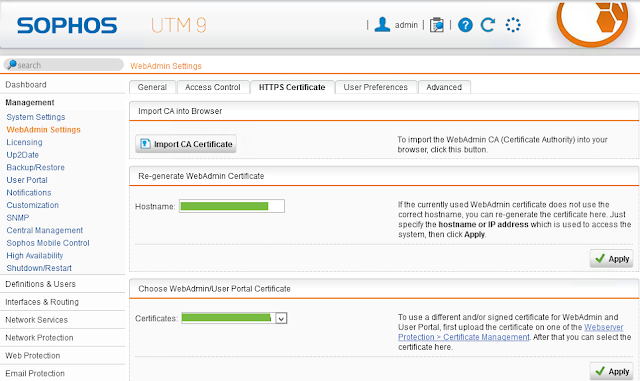
7. And finally configure UTM to use the new certificate for Web pages


As you see Sophos UTM again proves to be an ideal virtual networking solution for a home lab. 


Wednesday 7 September 2016

Organising remote access to your home lab with Sophos UTM


The Sophos UTM is way more than just a virtual router appliance. It is a swiss-knife with so many useful features. I have been using Sophos UTM for about 3 years. Two of them I used UTM in a production environment and it proved to be a very solid and reliable networking solution.

The good thing about Sophos UTM that makes it an ideal candidate for home networking is that you can get a free Home Edition license with plenty of features. You can grab your copy here.

Today I will be showing how easy and quick it is to configure remote access to your homelab with Sophos UTM.

The virtual appliance offers you a plenty of Remote VPN options:


  • SSL
  • PPTP
  • L2TP over IPsec
  • IPsec
  • HTML5 VPN
  • Cisco VPN

I generally prefer to use SSL and HTML5 VPN. 


The former provides the best performance and is very secure, but it requires a client to be installed on your computer. The most popular OpenVPN SSL client for Mac is Tunnelblick. It never let me down.

The latter is HTML5 VPN. I normally use it as a backup method of remote access into my home lab when I can't use my Mac, e.g. in a customer's office. It doesn't require a client and runs just fine in your favourite browser. However, as you might have already guessed, it is not fast. Also, there are very few protocols that can be used via HTML5 VPN portal.  With all that said it is still an awesome client-less remote access option.


So, let's have a look at how you configure SSL and HTML5 VPN on Sophos and how to configure Tunnelblick SSL client on your Mac.

Here is a simplified diagram of my home lab network topology 


We will start with HTML5 VPN configuration.


1. Go to the Remote Access options and Enable HTML5 VPN Portal


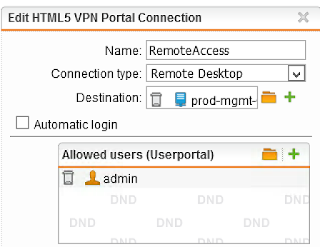
2. Click the New HTML5 VPN Portal Connection button and configure the following settings:

  • Name of the Portal
  • Connection Type - choose your protocol
  • The host you want to access via the HTML5 VPN
  • The users allowed to log into this remote access.
I usually go with RDP and my Jump Host. 

3.  Now go to Management - User Portal configuration:
  • Enable the End User portal
  • Configure the Allowed Networks or Hosts that will be able to access the Portal web page.


Since I usually don't know what my remote IP Address will be (unless I work in the office) I prefer to rely on Dynamic DNS. I have been using noip.com as a dynamic DNS solution and I have no reasons to complain about them.

4.  The last step would be configuring port forwarding on your Internet modem/router so that you could access the Sophos UTM on the Internet. That's how it looks on my NetComm modem.


Check your modem's documentation on how to configure PAT/NAT.

Tip: If your modem often renews public IP Address you could use Dynamic DNS as well.

Now you are all set and ready to go, so let's see how it works

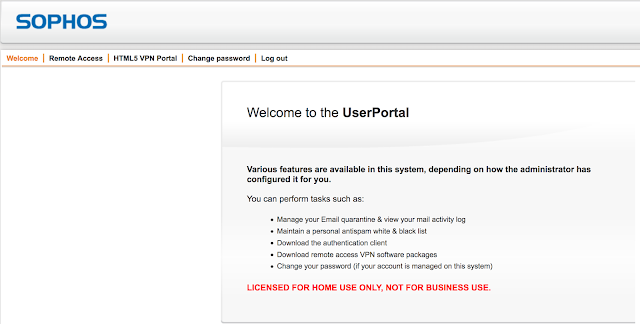
1.  Open your browser and enter the public IP Address of your modem or Dynamic DNS name.

2. Enter the credentials


3. Click HTML5 VPN Portal button


4. That's where you can see the JumpHost you configured in Step 2.


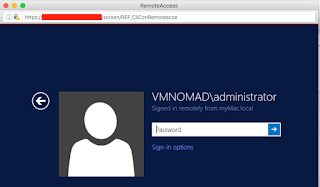
5. Press Connect button and Enjoy clientless RDP access via HTML5.


Now let's go through the configuration of Remote Access via SSL

1. Enable the End User Portal.

We already did it in the step 3 of the HTML5 VPN Remote Access configuration procedure.

2. Go to Remote Access - SSL


3. Press New Remote Access Profile button and configure the following settings


  • Name of the Profile
  • Users allowed to use SSL Remote Access
  • Networks that will be available when SSL VPN is established.
  • Make sure the Automatic Firewall Rules checkbox is ticked.


4. Go to Advanced Setting and enter your Dynamic DNS record into the Override Hostname field. Alternatively, if you use static Public IP address you can enter it here.


5.  Again, configure Port Forwarding to the External Interface of the Sophos UTM on your home modem/router.

That's it. The configuration of Remote Access SSL is complete on the Sophos UTM.

Now let's see how we configure the OpenVPN SSL client on your Mac or Windows.

1.  Download and install Tunnelblick

2. Go to your browser and enter the public IP Address of your modem or Dynamic DNS name.

3. Enter your credentials

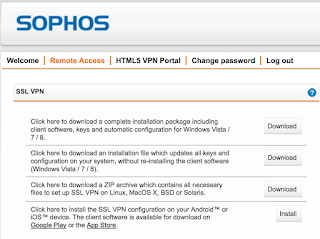
4. Open Remote Access tab


5. For Windows the installation is very straightforward. Download and install the VPN client. That's it. 

6. For Mac you will need to download the ZIP file that contains all configuration files for the Tunnelblick

7. That's what you will see inside the zip archive


8. Right-click the .ovpn file and open it with Tunnelblick


9. After the new .ovpn profile is installed you can initiate a VPN tunnel from the Tunnelblick


9. Enter admin credentials

10. Confirm the Tunnelblick is connected


11. Ping anything on the home lab network from your computer to confirm everything is working fine


As you can see it doesn't take more than 5-10 minutes to setup 2 different types of Remote Access and no deep knowledge of networking or VPN is required. It just works. 

Thursday 28 July 2016

Isolating vSphere Replication Traffic

One of the new great features of vSphere Replication 6 is traffic isolation, which significantly enhances security and facilitates QoS using Network I/O Control feature.

Even though TCP/IP stacks are not useful for moving vSphere Replication traffic to separate network it is not too difficult to achieve the same result using static routes.

In this post I will show the different types of vSphere Replication traffic flows and will explain how to achieve full isolation of the replication traffic from management network.

Thursday 14 July 2016

Automating configuration of a scratch location with PowerCLI

Quite often the modern ESXi servers come with no local storage and ESXi is normally installed on SD card.

As per VMware KB1033696 the SD card can't be used to store scratch partition. The main purpose of the scratch partition is to store logging files and to provide space for vm-support output.

So, the normal practice is to use shared storage (VMFS/NFS) as a scratch location. The problem is that the configuration of the scratch location is not automated in the existing vSphere. So you have to manually create folder for each of the ESXi host and configure each ESXi host to use that folder.
This can be quite time-consuming and boring tasks when you have to do it for hundred of servers.
To make things worse Host Profiles do not let you configure scratch location too.

I had some time last week and thought it was a good chance to have fun with PowerCLI and automate the scratch configuration for ESXi hosts.

So here is overview of what the script does:

  1. Connects to vCenter
  2. Collects the list of ESXi hosts in the cluster. Very often storage is not shared across multiple compute clusters so I decided to use cluster, not a datacenter, as a configuration target.
  3. Checks if there is a designated scratch folder for each of the clusters and creates if it doesn't exist
  4. Checks if the ESXi host configured with scratch location and if it points to the right datastore and folder.
  5. If ESXi is not configured yet or points to the wrong directory the correct setting will be applied.
  6. Provides a list of the ESXi servers to be rebooted for the configuration change to take effect

There are a couple of thing you have to do before running the script:
  • Identify the datastore to be used to store scratch folders
  • In that datastore create a folder where the script will create a scratch folder per each host 

 The syntax is as following:

.\scratch.ps1 -vCenter vCenter_Name -cluster Cluster_Name -datastore Datastore_Name -folder Folder_Name
for example

.\scratch.ps1 -vCenter lab-vc-01.lab.local -cluster HA -datastore ISO -folder Scratch
* I had to add folder as input parameter because I couldn't make the script land into the correct folder with New-PSdrive commandlet

You can go even further by taking advantage of Windows Task Scheduler to run this script on a daily basis to ensure all servers are consistently configured.

Let me know how it worked for you.

Friday 8 July 2016

vSphere Distributed Switch and Nexus 1000v comparison


Choosing between VMware and Cisco virtual switch products is not an easy tasks as it includes not only side-by-side feature comparison, but also numerous aspects of duty separations, operational overhead, current skill set and expertise. And not all of them can be compared directly. 

Apart from all that it can be simply a political decision to a question "Who is going to manage virtual networks?". 

In this article I am trying to provide essential information on things to help you make the right decision for your infrastructure.

Saturday 11 June 2016

Bulk IP Address change with PowerCLI

Recently I was given an interesting task on IP Renumbering of more than a hundred VMs.
Along the IP Address change the VMs had to be moved to a new PortGroup.

Doing it manually can be pretty tiresome and boring. The PowerCLI is a perfect option for this task as it relies on leveraging of VMware Tools. Therefore, loosing network connectivity to the VM due to the IP Address change or after the VM is moved to another Portgroup won't impact the functionality of the script.

Prior running the script you will need to prepare the CSV file with the list of VMs to be updated and the following information for each VM: ServerName, Username, Password, NewPortgroup, OrigIP, NewIP, NewMask, NewGateway

Here is how my Inventory.csv file looks like.


When running the script you will need to provide the path to CSV file and the name of your vCenter

ChangeIP.ps1 -Inventory c:\Scripts\inventory.csv - VC lab-vc-01.lab.local


And here is the script text. Hopefully there are enough comments to help you read the script so that you could adjust it to your needs.


Saturday 28 May 2016

NUMA and Cluster-On-Die

NUMA implementation has gone through several phases of Development in vSphere. At first, it was only responsible for initial placement of VMs, then its functionality was extended with dynamic balancing. In vSphere 5 VMware has presented support of Wide-VMs by exposing NUMA architecture to virtual machines.

New CPUs have presented additional feature - Cluster-on-Die - of splitting physical CPU sockets into  NUMA domains. 

The Full article can be read here

Thursday 19 May 2016

C# Client is dead, long live the Web Client


Yep, C# client will no longer be available in the next releases of vSphere.

VMware have been giving a pretty clear signals in the last major vSphere releases that C# client would be gone soon, but nobody knew when exactly it was going to happen. However, when SRM and VUM were moved to web client in vSphere 6 it was obvious C# client's days are numbered.

Probably it could have been done a couple of years ago, but first Web client wasn't good enough due to performance issues. It also lacked integration with other VMware solutions and there was no replacement of C# client for standalone ESXi hosts.

Today VMware have moved its plugins (SRM, VUM) to the Web client and other VMware partners are sailing in the same direction. It also presented new embedded HTML5 Host client for ESXi hosts, which has feature parity with C# client for standalone hosts.

Here are some of web client benefits compared to C# client:

  • Scalability – WC handles more objects and more concurrent admin access
  • Bookmarking URLs - WC allows you to quickly return to specific objects or views and share them with others (such as in a support ticket)
  • Recent Objects - WC lets you navigate quickly between things you’re working on
  • Work-In-Progress - WC lets you save your work and come back to it later, even from another computer!
  • Enhanced Linked Mode – WC can call up all your inventory in one view
  • Remembers user customizations to UI – WC enables column selections and widths on grids, portlets on summary pages
  • Latest feature support – WC is the only interface to support all new features 

As a short-term goal I think VMware will be focusing on fixing Client Integration Plugin which causes most of the issues with Web client - people having issues with OVF import, browsing datastores. It also doesn't work on Mac.

The long term goal would be to have a single ultimate client for vSphere and ESXi hosts. That's what actually VMware is doing right now by trying to replace Flash Web client with HTML5. You can already have a preview of H5 Web Client for vSphere - it exists as a Fling.

It has to be noted that The C# client will be kept in all current platforms.

You can read the official announcement here and that's where you can leave your feedback. 

Friday 29 April 2016

VMware Virtual SAN Network Design Guide v2.0 is just released

VMware has just released the document that covers network aspects of Virtual SAN design. 

Actually, the guide has been re-released as there was v1.0 before (hence the new one goes under v2.0), but as far as I am aware it was removed from the VMware web site due to some inaccuracies in it. So for a while people lacked validated design information on one of the key aspect of VSAN setup. I remember there were quite a few discussions on how to provide network redundancy and load-balancing for VSAN traffic and nobody could get a formal answer.

The guide is very comprehensive and even provides mutlicast configuration examples on Cisco and Brocade switches.


You can check the guide here

Wednesday 27 April 2016

Check out the new VSAN 6.2 Hands-On-Lab

VMware has just released new "HOL-SDC-1608 What's New with Virtual SAN 6.2" Hands-On-Lab

It covers all new functionality the VMware brought in new VSAN 6.2, e.g. compression and deduplication on AF, new SPBM settings, new ESXCLI VSAN namespace, etc.


However, the HOL assumes you have basic knowledge of VSAN. For instance, networking design isn't covered here. 

Interestingly, the networking configuration in this HOL still contains 2  VSAN VMK interfaces whereas generally it is recommended to have only 1 VMK and provide HA by NIC teaming and Load Balancing with LACP.

Even though I have VSAN 6.2 deployed in my home lab I still skimmed through the VSAN 6.2 HOL and I can tell it is pretty useful as I have learnt something new.

You can find it here - VSAN 6.2 HOL

Thursday 21 April 2016

Migration from Windows vCenter 5.5 to vCenter Server Appliance 6.2 - Part 3 - Upgrade ESXi hosts with ESXCLI

My servers have ILO , but that's not working good as it is based on Java - all kinds of problems with java in browsers, especially on Mac. So I usually avoid using it even though I pretty often used it before to mount ISO on servers over the network for ESXi installation and upgrade.

Given my issues with ILO I opted for an easier upgrade option - using powerful esxcli command

1. Upload image to the datastore


2. Check the profiles list in your depot file


3. You can check the each profile's details


That will show you the VIBs it includes and even the corresponding KB


4. Once you choose required profile just run the following command


As you can see the host was upgraded successfully, but it has to be restarted.

Tuesday 19 April 2016

How to deploy VSAN 6.2 Witness Virtual Appliance to VMware Fusion 8.1

Since I moved to vSphere 6 U2 I started to plan my VSAN deployment. The problem I have is that there are only two physical servers in my home lab and I have no physical server to host VSAN Witness appliance. I am trying to make it run on my Synology DS415+ (crazy, but seems to be doable), but I need to upgrade RAM on Synology first.

As a temp solution I thought I could run VSAN 6.2 Witness on my Mac. William Lam has already posted a great post on how to Deploy and Run VSAN 6.1 Witness in VMware Workstation/Fusion, but I faced a small issue when following it. 

First it warned me that there is OVF specification and hardware compliance mismatch.  


And after that it failed to proceed with error "Line 821: Unexpected element 'Propery'"


Line 821 referred to the line we have to adjust in Step 3 as per William's guideline. I don't really know whether OVF file for VSAN 6.1 Witness was different or it is a newer version of VMware Fusion that can't parse the OVF file, but here is what I did to make it work. 

Just a small note - all credits for the following procedure go to William Lam. I only adjusted a couple of steps in his procedure to make it work for VSAN 6.2 Virtual Witness Appliance running in VMware Fusion 8.1.


1. Extract content of the OVA file using VMware OVF tool.

/Applications/VMware\ OVF\ Tool/ovftool VMware-VirtualSAN-Witness-6.0.0.update02-3620759.ova VMware-VirtualSAN-Witness-6.0.0.update02-3620759.ovf
2. Create a copy of OVF file in case something goes wrong. It is a quicker option than extracting OVA content again

3. Open OVF (you can even use default textEdit utility) and adjust the appliance size by moving the text marked in Red

<Configuration off:default="true" off:id="normal">
to the following string

<Configuration off:default="true" off:id="tiny">
3. Go to line 821 and delete the following text - marked in the screenshot


Btw, even though textEdit doesn't show line numbers you can still press Cmd+L and type the line number you want to go to. 


You can save and close OVF file now.

4. Create new SHA1 checksum for updated OVF file

openssl sha1 VMware-VirtualSAN-Witness-6.0.0.update02-3620759.ovf


5. Update the OVF file checksum in manifest file


6. Now you can import VSAN 6.2 Witness, but don't press Finish yet.


7. Get to the VM's locations and open the package to get to the .VMX file


8. Open the .VMX file - again, textEdit works just fine, add the following code and replace the password


guestinfo.ovfEnv = "<?xml version='1.0' encoding='UTF-8'?><Environment xmlns='http://schemas.dmtf.org/ovf/environment/1' xmlns:oe='http://schemas.dmtf.org/ovf/environment/1'><PropertySection><Property oe:key='vsan.witness.root.passwd' oe:value='Password123'/></PropertySection></Environment>"
9. Once you save the file you can run the Witness Appliance.


Saturday 16 April 2016

Migration from Windows vCenter 5.5 to vCenter Server Appliance 6.2 - Part 4 - Moving to external PSC

We got to the last step of our short journey. In this post I will be deploying new PSC appliance and then will reconfigure my vCSA to use external PSC instead of embedded once. 
For the lab of my size Embedded PSC is a preferable option, however I am going to deploy another vCSA and a couple of nested ESXi servers later to be able to test more interestings scenarios in the lab. And for that I will need my vCSA to use External PSC.

1. Create a DNS A record for new PSC.
That's an official prerequisite when deploying new PSC or vCSA. Without DNS record the installation process will fail. 

2. Deploy new PSC


2. Select Datacenter


3. Choose Deployment option - link to PSC Descision tree

Btw, there is a great PSC Deployment decision tree which helps you to decide on the best PSC deployment option 


4. Join to existing SSO domain


5. Choose Site


6. PSC comes in one size only


7. Select the datastore for PSC


8. Configure Networking


9. Review Summary and Click Finish


10. SSH to the new appliance and check the replication status

You don't really want to repoint you vCSA to external PSC that failed to replicate current configuration from the embedded PSC or has some issues with services health 

11. Check the new PSC status in the Web client


12. Join new PSC to the domain 

I almost overlooked this aspect, but I accidentaly remembered that I had read something about it in William Lam's blog


13. Repoint vCenter to new external PSC 


and we are done here. The goal is achieved. 

Now I can get to configure and test new VSAN 6.2 and plenty of other new features of vSphere 6.